GUIDE: Setting Colors in AutoCad for Laser Cutting at IMRC Center
By Mason Bloomquist
When you go to draw up your final draft of your cutout, the first step is to look at your drawing. Plan out which lines will be the outline, and will be cut all the way through, as well as which lines you will want to engrave. Consider pieces that you plan to cut out on the inside as well as if there is anything that would be cut off of the main body when the outline is run. For all of the engraving, consider which parts of your carving you want to be a certain depth if you plan on having different shades or depths for the engraved section. For example, you may want the text to be a different color or depth than you want your line designs.
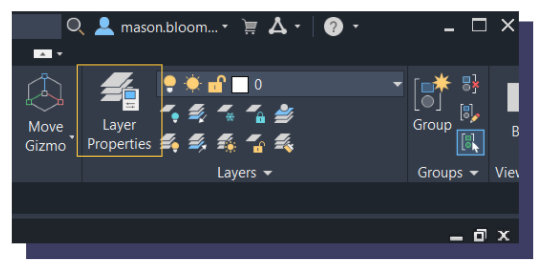
When you have decided which parts of your drawing will be cut in what ways, make layers for each of your cutting depths. It’s helpful to rename each layer as you go to stay organized. To create a new layer, simply select
‘layer properties,’ then hit the ‘new layer’ button.
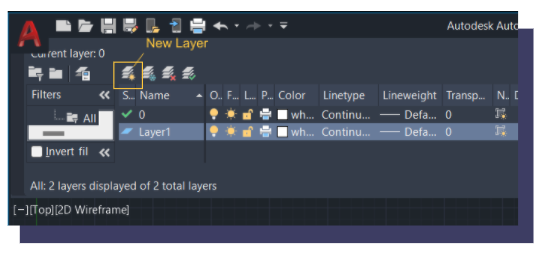 This will create a new layer for you to draw on but you will need to double click it and make sure the green checkmark or it will continue to draw on the previous layer.
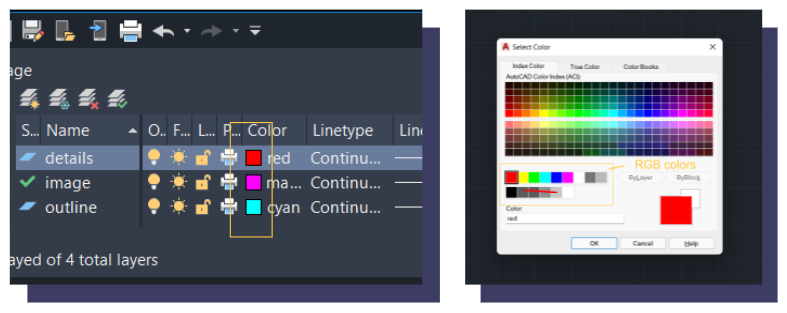
Each of these layers will be assigned an RGB color. To decide which is best for each cut, consider the order the colors run in the UCP software. Because cyan (⬤) is so far down the list of colors, it is a good choice for the outline of your project. Any color can be used for any depth cut. The settings for the power and speed can be adjusted to fit your needs with the settings in UCP. Though it’s best to remember that if you cut the outline of your project before the engraved details, it may fall to a different depth than the rest of the board falling out of focus for the laser. This can result in less detail than you wanted.
Now that you have planned out which lines will be in what color, you can set each of them by clicking the white box on the layer bar and select the color from the bar of color at the bottom of the index color tab excluding the gray and white tones. Only RGB colors will work with the UCP so make sure what you use is labeled as the color with its written name instead of a number.
Finally, draw your design by utilizing the layers you just made to separate which parts will be cut in which way (‘outline’ in one color, ‘engraving one’ in another). You can then print to a PDF and move it onto a hard drive to be opened in Adobe in the lab.
If everything was colored correctly, you should only need to adjust the size and the line thickness before printing to UCP. If you had text and the font was not supported by Adobe, try to change the font of the preexisting text box so that you keep the color the way you have it.